Sunday, August 15, 2010

Iron Chef: Yoghurt Adventure

When I was in Byron recently I was excited to stumble across a Queensland brand of yoghurt made from coconuts. It seemed perfect for the upcoming Iron Chef battle. I found a recipe for yoghurt in “Eat Vegetarian” by Sam Stern (which is one of my favourite cookbooks at the moment) and substituted milk for coconut milk. Before I regale you with the horrendous failure that was Friday night’s yoghurt attempt, here is the recipe I was using:
  • 1 litre of coconut milk
  • 1 sachet of natural yoghurt starter (health food shops have these)
  1. Boil the milk until it rises, then remove from heat.
  2. Pour into a bowl or jug let the milk cool down to luke warm (about 40 degrees).
  3. Stir in the yoghurt.
  4. Leave, covered, for 6-8 hours somewhere warm. It’s important that the temperature is around the 38 degree mark and that the yoghurt isn’t disturbed. The yoghurt should thicken – you might need to leave it longer if the temperature is low.
  5. Put yoghurt in the fridge to cool – and then it’s ready to eat! You can use this recipe to make greek style yoghurt just by straining it.

Sounds pretty easy, right? That’s what I thought. I was all ready to go, I had my pot and cans of coconut milk, my yoghurt starter and a spoon, and had fired up the (one working) hot plate. Five minutes later it became apparent that the one working hot plate did not work. I decided to utilise some high-end engineering skills, and hit the stove top whilst swearing colourfully.
I tried the other hot plates. Maybe, in dying, it had given its power to one of the others. To my surprise, the third plate I tried did begin to heat – a few minutes after spewing noxious smoke into the kitchen. Once the fumes had cleared, it worked quite well. And by well, I mean five times more slowly than it should have.

But, the coconut boiled. Good – now for the easy stuff! I should mention that the starter I used is not from an English speaking country – nothing on the box is written in English, and there was just the shop’s sticker explaining what it was. Luckily there was a small slip of English instructions inside; however neither the “don’t disturb while maturing” nor the “leave for longer if cold” advice were immediately obvious on these instructions.

Sam Stern suggests wrapping a towel around your yoghurt “if it is chilly”.


Ten hours later, the Antarctic climate of our house had produced a saucepan of: coconut milk.


No yoghurt. No yoghurt-ish texture, no yoghurt-ish flavour. Damn.

In the end I heated my oven to 50 degrees, let it cool a smidgen and then put the yoghurt in there. I repeated this process over the next 8 hours, and by lunchtime on Battle Day the milk began to taste like yoghurt, and was a bit thicker. Presumably, if I had done this to begin with, and hadn’t moved it about so much, it would have actually worked the way it was meant to.

I added some pineapple bits & juice to the yoghurt-ish slop, and it actually tasted pretty good. With a bit of honey and cinnamon, poured over fresh fruit, I didn’t think it did too badly. Certainly not what I was going for, but I think I’ll try again at some point. I’m thinking that if you put the yoghurt in a jug, and then put the jug in a bowl of boiling water, you’d be able to keep the temperature constant by switching the water whenever it cooled.

Do not let my failure deter you – clearly I am inept and an idiot. Sam Stern’s book is brilliant: he’s kind of like a tiny Jamie Oliver who seems to favour vegetables. His book has lots of pictures, easy to follow instructions, and great advice about substitutions and variations on all the recipes. He explains how to make heaps of basic stuff from scratch – like bread, yoghurt, cheese, and pizza – and from there you have so much scope to experiment. I’ll do a post on some of his bread recipes I’ve tried eventually. I suspect his yoghurt may work perfectly for actual milk; a friend informed me that coconut juice used to be used to sanitise wounds which might explain its reluctance to host bacteria in our freezing cold lounge room.

Ironchef: Coconut Battle


We have just finished cleaning up after the epic success (and epic mess) that was our first Iron Chef battle (oh yes, there will be others). There were nine contestants in all, and the following contributions:
  • Prawn Skewers with Coconut peanut sauce
  • Coconut Rice
  • Salad with Coconut & Sweet Chilli dressing
  • Cashew, Miso & Coconut tartlet thingies
  • Fruit Salad with Coconut Yoghurt
  • Coconut Fondue
  • Black rice pudding with coconut topping
  • Coconut & Lime Cheesecake
Black Rice pudding with Coconut milk & toasted shredded coconut
Possibly the most inventive dish, however, was a whole unopened coconut and a soft drink straw. We’ll be saving that puppy for the house warming, when we move house in a few weeks time. I’ll be posting the full recipes for everything that was made – when people pass them on to me – but in the meantime, feast on these:


Lime and coconut Cheese Cake - as delicious as it is beautiful to behold.


Salad (with desiccated coconut); the coconut & sweet chilli dressing is just visible in the background.


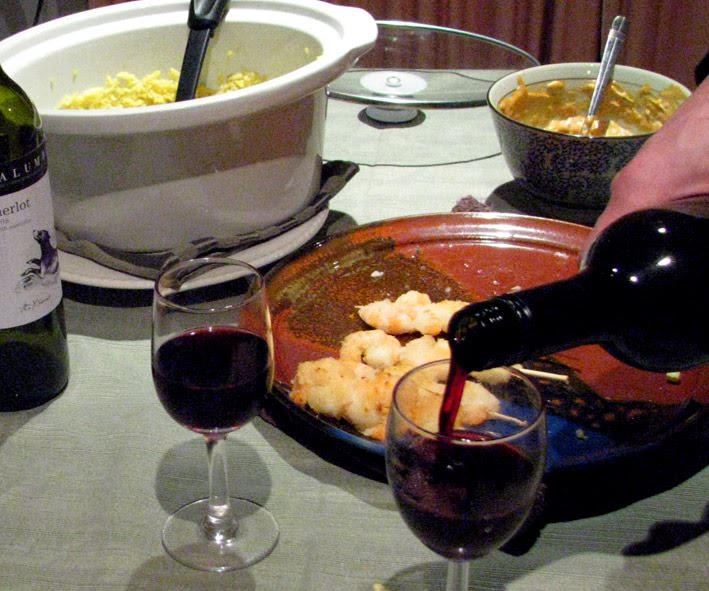
The wine is not made from coconut - but note the remaining prawn skewers. Obviously I did not have these, but they got Girlfriend's vote for dish of the night.


Gorgeously sweet and indulgent: black rice pudding, with, of course, coconut - and vietnamese mint, of all things. Can't wait for the recipe for that one.


Fruit Salad & Coconut Yoghurt


Coconut fondue - there's a tealight in the hollowed out pineapple on which the bowl rests. Astounding what people can do these days.


Needless to say, fun was had, mess was made, and OldSpice Ads were watched on Youtube.

Sunday, August 1, 2010

Best Breakfast in Da World


How good are pancakes? I have found, in my quest to live forever, that things don't have to be "bad for you" in order to taste good. This is my favourite breakfast - complete with fibre, fruit, and no added sugars.


Apple & Banana Pancakes

These pancakes have their own unique and delicious flavour, so I don't add any honey - but if you have a sweet tooth honey or maple syrup are perfect toppings. I love the contrast of the warm, filling pancakes and the cool, freshness of the cold banana. It's like getting the best of both worlds: satisfying and refreshing all at once.


  • 1 egg
  • 1 tsp butter, melted (optional - I don't add butter)
  • 1 1/4 cups of milk
  • 1 cup flour (I use wholemeal for fibre; white makes lighter pancakes)
  • 2 tsp baking powder
  • 2 apples, peeled & grated (when in season, green ones work best)
  • cinnamon (to taste - I use about a bucket)
  • Vanilla essence (to taste - I use a tablespoon)
  • pinch of nutmeg (optional)

  • Banana (slice and serve atop pancakes)
  • Honey or real maple syrup (topping, optional)

  1. Make mixture by sifting together dry ingredients and then adding the wet ones. I cheat and use a blender stick to mix everything together, but potentially folding with a spoon will keep the mixture lighter.
  2. Add the grated apple last, stir together.
  3. Cook in a frying pan (see below for tips).
  4. Serve topped with freshly sliced banana and, if you like, honey or maple syrup.

Makes enough for two hungry lesbians, with a serving of leftovers (mmm, cold pancakes for lunch!)

The original recipe calls for only one apple to every cup of flour, so my version is more like an apple fritter than a pancake with apples in it. If you prefer a bit more fluffiness leaving out some of the apple will do the trick. You can also add in some banana to the mix instead of one of the apples: I did this when I cooked for my mum, and they worked brilliantly. The mix can be made up the night before - in fact, this is what I always do, because I think it makes them taste better - but you will usually need to add a little extra milk the following morning.


How to cook pancakes

I have been taking singing lessons since I was 12, and I have found that the best teachers are not necessarily the best singers. At first that doesn't make sense, but the reason is quite sensible. "Naturally gifted" people never really had to learn themselves. They either could just do what they could do without guidance, or having been shown once, were able to pick it up and do it perfectly without practice.

Really good teachers struggled to understand concepts, came up against obstacles, practiced, failed, made mistakes, tried a thousand different methods, and finally mastered the best techniques.

Be assured that I am not naturally gifted. I have made many pancake-scrambles, pitch black fritters, and seemingly perfect concoctions that run gooey and white in the middle (I actually like them this way, but that's another story). Because I am so utterly inept, I've had to play a lot of trial and error, and I have been forced to make pancakes almost every week just to practice. (the things I do for my art)

Here are some tips that have helped me make pancakes that people will actually eat:

  • Use a good non-stick frying pan. This is probably the most important thing for me. I love my frying pan. It's one of the only really good quality items I have in my kitchen. And it does make a difference - the difference between carcinogenic goop and pancakes.

  • Wait for the frying pan to reach the right temperature. The first batch always goes awry for me when I rush in - so I normally cook a single pancake to check the temperature before marching on with the rest.

  • Use a temperature which is hot enough to change the colour of the pancake, but will not burn the outside before the inside is cooked. I usually use a slightly higher temp for side one, then down the volume when I flip the pancake for side two.

  • Be patient. Don't flip the pancakes before they are ready. If you're using a good frying pan, they should slide easily onto your flipper when they want to be turned. If they offer resistance it is because that side is still cooking, and the mixture is sticking to the pan. Just leave them for a bit longer and try again.

  • Normally the "bubble" method works well - watching bubbles form and pop on the surface of the pancakes - but this is less effective with these particular pancakes as the quantity of apples makes for less bubble visibility. I usually rely on the "flipper test" above.

Monday, July 26, 2010

Some things about Meat


I do not eat meat because of an anxiety disorder - I have "carnophobia", or an irrational fear of consuming meat. However, here are some interesting facts about meat that others might wish to cite in favour of Vegetarianism:

  • Turkeys bred for consumption cannot reproduce naturally - cannot, in fact, have sex - due to the grossly unnatural size of their breasts. That's right, big boobs = no turkey sex. All turkey sold in American supermarkets has been artificially inseminated, even the "Free range" and "natural" branded stuff. I have no idea what the turkey situation is like here in Australia. Do you?

  • To be branded as "free range" in America, chickens need to have "access to the outdoors" which, on further analysis, proves to be meaningless. As many authors (eg Singer, Saffran Foer) have discovered, "free range" chickens still have less than 1 A4 sheet of paper on which to stand, are packed into barns with no places to perch, and their access to the outdoors may be for a few hours of daylight a few days of a few months every year. They are still bred to grow so fat so quickly that their bones do not develop properly, and they often cannot walk properly. They still have their beaks seared off to stop them pecking each other. They still stand or kneel in thick piles of their own shit, causing all kinds of sores and infections, including blindness and respiratory problems. As Jonathon Saffran Foer eloquently says in his book Eating Animals: "One can reliably assume that most 'free-range' (or 'cage-free') laying hens are debeaked, drugged, and cruelly slaughtered once 'spent'. I could keep a flock of hens under my sink and call them free-range."

  • Singer, in his book the Ethics of What we Eat mentions that debeaking is "common practice" in Australia, as well. Chicken's beaks are like our fingers. Imagine having your child's fingers sawn off with a hot blade, with no anaesthetic. Then imagine that child living out their existence in artificial light, shoulder to shoulder with other fingerless children, up to their knees in excrement, for the rest of their lives - luckily, though, their lives are only 39-42 days. At this stage they will be plump and delicious and ready to slaughter. Assuming they have lived this long, of course.

  • Now, in Australia, it is possible that there are egg sellers who use the term "Free Range" in the sense that we would assume it is meant, and that their birds are not debeaked or put through other factory-farm suffering. But how can you tell? If "free range" apparently means nothing, which eggs do you buy? I personally would opt to buy eggs off a neighbour who owns her own hens. Wouldn't you?

  • Did you know that the chickens that produce our eggs and the chickens that produce our meat are no longer the same chickens? I found this fascinating. You see, they are bred to be extra specially good at what they do: which means fast growing chubby chooks (broilers) for our dinner plates, and over-laying ladies to pop out 300 eggs in their first year (before being sold for pet food, as it becomes economically unsavoury to house hens who have dropped 50% in productivity by year 2). Which raises the question, what happens to male "layers"? Well, they're pretty useless, actually. They grow too slowly and don't get fat enough to eat, and, shame for them, they can't lay eggs. I won't post the links, because that would be gratuitous, but there are photos all over the internet of baby male layers being thrown into dumpsters to suffocate, or into machines that are effectively wood chippers for live chicks. Chick Chippers, if you will. Has a nice ring to it, doesn't it? VeganPeace.com has some photos if you really must upset yourself further.

  • The suffering of the vast number of pigs farmed by factory methods aside, let's talk a little more about shit. I can do no better than to summarise Saffran Foer's explanation of the several hundred 120,000 square feet shit "lagoons" that surround each hog farm: "If you were to fall into one, you would die... just as you would die of asphyxiation, within minutes, if the power went out while you were in one of the hog sheds."

This topic is endlessly fascinating to me, but I think it's time for a recipe.


Dinner

  • Take some fresh vegetables
  • Add some herbs and spices
  • Apply heat according to your methodology of choice
  • Serve atop your favourite carbohydrate, cooked in whichever manner you fancy

Delicious. If you're still hungry, however, Jonathan, again in "Eating Animals", offers a mouth watering recipe for Filipino Stewed Dog ("wedding style", apparently). Presumably it could apply just as deliciously to cats, if you're not really a dog person.

Saturday, July 24, 2010

Chocolate on Noses


My favourite things about being an educated, comfortably well off, free citizen living in an affluent country are muffins.

Not least of all because of the child like joy they induce in Girlfriend, when she's prancing about the house sniffing the muffin scented air and counting down to our little treats popping out of the oven.

Muffins deserve their own tier on the Food Pyramid; "eat these for the soul".

This was a joint effort; GF melted the chocolate and ate the muffins, I mixed the other ingredients and licked the bowl ^_^
Chocolate Muffins with a Hint of Banana

2 generous cups of flour (I used half/half plain and wholemeal)
2 equally generous teaspoons baking powder
1 egg
2 tbl spoons melted butter
100g melted chocolate
1 cup of hot (but not boiling) milk
2 generous table spoons cocoa
1/4 cup agave syrup
brown sugar (optional, to taste)
banana, mashed (to taste - eg, 2 small bananas)

  • Sift all the dry ingredients together.
  • To melt chocolate, boil some water in a pot, and put another pot/bowl on top, with the chocolate inside. The boiling water will warm up the chocolate bowl and thus melt the chocolate, and you can control the heat so that it melts gradually and evenly without burning. Stir constantly while doing this.
  • Combine all the wet ingredients with the dry, including the melted chocolate.
  • Add the banana last. When I say "mashed", I mean with a folk - don't puree it into a liquid, it's meant to create lumpy banana bits throughout the muffin.
  • Cook in a preheated oven for about 20 minutes at 180C (it took my muffins a few minutes longer than this).

Wednesday, July 21, 2010

if only we could save the world with curry

Do you know what a fistula is? It is horrible. If you do not wish to know, scroll down until you get to the curry recipe.

Ok, so now I should just have the attention of people who are really curious about this fistula thing. Right then: sometimes in extremely poor countries women (girls, really) become pregnant when they are severely malnourished or far, far too young - their bodies aren't developed enough. As you can imagine, there can be major complications when they give birth. Apart from the fact that the babies often die in these scenarios, it can cause the woman's bladder or bowel to tear and run freely into the vagina. These fistulas - holes where holes should not exist - are also often caused by sexual violence, for example in areas where rape is used as a tool of war. Because of the smell that this fistula causes, husbands may turn their fistula'd wife back to their families. In turn, the families will not want this divorced, smelly creature in their home - so they build a special hut for her. She lives out the rest of her life in stench, shame, and isolation.

And guess what: it costs less than a flat-screen TV to give this girl an operation to "cure" her fistula. So many - so, so many - are in this horrible situation, and it is so so easy for us to help.

Did you know that lower income earners generally give a higher percentage of their income to charities than high income earners?

Peter Singer, in his book, "The Life You Can Save" puts forward a highly moral but unsettling argument that we are "doing wrong" if we spend money increasing the material pleasures in our own lives, when that money could be spent on saving a life. We "should" (he says) give everything we can until the point at which what we are giving is more important than what we are saving - so we shouldn't starve our own children to feed the hungry in Africa, but we could live with the social shame of not owning a flat screen TV in order to save a girl from the lifelong degradation and loneliness of living with fistula.

However, he accepts (and explains many of the reasons why) vanishingly few people are going to give away the amount of time or money they "should". He even suggests that people who give away "more than average", as a percentage of their income, should be praised for doing so. After all, we can feel turned off if we feel like we are doing "more than our fair share" while others donate nothing; or for that matter overwhelmed by the implications of "giving until we can give no more".

Singer gives a lot of facts and figures about how much people would need to give to halve, or even eliminate, poverty. It's uplifting to see how little it would actually take, per person - however, it is also deeply depressing, because these figures are based on the assumption that everyone who "Can", will. Which, as we all know, just isn't the case.

5% of your total income, if you are "comfortably off", is what Singer suggests as a compromise for Americans (and more if you are one of the top 10% richest people in the country). From www.thelifeyoucansave.com I learnt that I fall into the lower end of earners, and according to the sliding scale he adopts would not be asked to donate anywhere near this much. However, I agree with Singer that I could be giving more - I own a flat-screen TV, and I just hired $10 worth of DVDs (two of them were terrible movies I didn't even finish watching).

So, today, I have done what Mr Singer suggests, and pledged "to do significantly more" than I was previously doing - I increased my donations to international charities to approximately 3% of my income. Why am I telling you this? Because research shows that people are more likely to donate if they know that others are. And my personal donation becomes more meaningful the more people contribute. As the website says, it might just be a drop in the bucket; but what if that drop were your daughter?

Go to www.thelifeyoucansave.com to learn more, and then make this absolutely delicious Nilgiri Korma, the recipe for which I created by mooshing together about 8 different recipes I found scattered about the web.

Nilgiri Korma

(free from all animal products and fistulas; guaranteed to cost less to make than a flat-screen TV)

There is a restaurant not far from us that used to do the most delicious, satisfying version of this curry. They must have changed chefs, however, because lately they've been serving watery, tasteless goop. This recipe is my attempt to recreate the original curry: it should be flavoursome and creamy, with lots of plump perfectly cooked vegetables.

Ingredients/Method
Rice - cook according to whichever philosophy works for you. Adding fried shredded coconut, cloves & saffron will make it just that little more special.


Add these food-stuffs to a wok in the order shown, pausing between each group to cook (gently!) a bit:

onion
ginger (fresh, grated or chopped finely)
chilli (to taste)

Vegetables (for example, carrots, broccoli, whatever you have left over from market day)

coconut milk (half now, half after cooking for a bit)

garam masala
cumin
poppy seeds
fennel
cinnamon stick

cashew paste (just blend together raw unsalted cashews with hot water)
coriander, fresh

Quantities
  • I use a whole can of coconut milk (one of the good sized ones, not the pissy tiny ones); I then estimate the quantity of vegetables needed to make the curry look good and full while still being very "saucy". I'd say about two cups of vegetables probably goes into mine, which makes enough for four meals (dinner for girlfriend and I, plus our lunches the next day).
  • I try to get a 1:1 ratio of coconut milk and cashew paste as the cashews create an amazing texture and flavour. I used some of the coconut milk to ground up the cashews rather than water, because I don't like to "Water down" the flavour.
  • As for spices, this is something your tongue will know better than I would. I use heaps of spices because I like a nice strong flavour. Sometimes I even add a teaspoon or two of commercial curry powder, just to crank it a notch.
  • I use dried herbs and spices apart from the coriander and ginger - these two just don't work for me in dried varieties.
  • The longer this cooks, the better it will taste. I therefore make the whole curry before I even start cooking the rice - it forces me to leave it brewing happily away for longer than I would otherwise. One of my many faults as a chef is that I'm impatient; if the food looks edible and smells delicious I just sort of face-plant with a snorkel instead of adhering to cooking times. Or cutlery.


Serve with Naan:

you will need about an hour and a half to prepare this; plus a few minutes cooking. It's best served immediately after cooking, so work out your timing well in advance. I just barely got this together on time!

Ingredients
1 Cup Flour
1 egg
½ packet yeast (dried active)
warm water (small amount, add tblspn at a time)
yoghurt (optional - obviously use less water if using yoghurt!)
herbs (I used shredded coconut and coriander)

Mix together all ingredients. Using a wooden spoon for this makes me feel Authentic. Some advise "proofing" the yeast first by adding it to some hot water and leaving it for a bit. Others advise that this is a waste of time as it is so unlikely for the yeast to be off. You may need to add more liquid or flour to your dough depending on the consistency of your mix. At this stage it should be coming off the sides of the bowl into a ball, but it won't be smooth and doughy yet - sticky but not impossibly so is good.

Turn onto a floured or oiled surface and knead. It will probably take about five or six minutes; possibly as long as ten, so put on a good CD. to begin with the dough probably feels rough, too floury in some places, far too sticky in others. The more you knead - adding flour/water as neccessary - the easier it gets. Believe it or not, that horrid lump of yeasty smelling crap becomes smooth, elastic, not sticky, but not dry. You know the yeast is off to a good working start when it feels like you are making the dough fart every time you punch it (mind you, too much farting probably means you have too much yeast all together).

Enough of that obscenity - put your fart ball into a bowl covered with a damp tea towel, and leave for about an hour in a warm place. It should double in size (powered by fart). If it rises faster than this, you don't live in Canberra, and also you won't have to wait for the full hour.

Now it is second kneading time - this time just give it a short pummel just to remind it who is boss. Reward your fart loaf with handfuls of your chosen herb, pummelling them lovingly into its body. Break your fart ball into lots of littler fart balls; just below the approximate size you want your naan to be. Leave the fart naans to rise a bit longer; perhaps half an hour this time.

When they look like they've had enough of that (they should have risen a little bit more) use your palm or a rolling pin to make them flattish - about the thickness of a pizza base worked for me.

Grill your naans for a few minutes on each side. You can drench them in butter for this process, as Girlfriend did, or be righteously healthy as I did. Hers tasted better. You can also fry them rather than grilling, but I was using our one working hotplate to boil rice, and we don't have enough power points, or bench, for another electric frying pan. Our grill works great, though!

Friday, July 16, 2010

recycling and cuddling are important to me

Don't you love lesbian stereotypes? Especially when the hot-chicks-having-sex-while-you-watch stereotypes meet the sport-playing-tofu-eating-techie stereotypes, as in this glorious video:


When you've finished watching that, go make this:


Creamy Mushroom & Cashew Sauce

I made this at least twice a week as a struggling uni student. Like me, it's cheap, easy and saucy. It's also suprisingly creamy for something without any cream, and the stock can make it as salty as you like, so it's a good health-fix if you're craving cream or cheese sauces.

Ingredients:

Raw, unsalted cashews
Hot water
Lemon Juice
Paprika
Cracked pepper
Beef flavoured veg stock (powder)
Onion
Mushrooms
(other veg as desired)
Capsicum
Coriander

Fettucine - put this on first if you're using store-bought, because it takes longer to cook than the homemade variety. Mine takes less than 3 minutes, so I put it on when the sauce is about ready.

Quantities:
  • The cashews and water make the sauce, so you need enough of these to cover your vegetables. I use about a cup and a half to make two big serves and have some leftovers.
  • The amount of water you use depends on how thick you want the sauce - start off with a 1:1 ratio and then just add more water if you want a smoother sauce.
  • About half a lemon worth of juice is what I use for my quantity.
  • I use a lot of paprika, but beware it can make the mixture gritty and "dirt" tasting if you use too much.
  • Sometimes I don't use any stock at all, and other days I put in a fair bit - depends on if I'm craving salt! The stock I use also adds an extra creaminess to the sauce (I believe the brand is Massals, and it is all animal product free).
Methodology:
  1. Firstly, buy a better food processor than me. I put the lid on mine, switched it on, and a spray of near-boiling water and badly chopped nuts flooded my kitchen bench, not to mention the clothes I had just changed into.
  2. Using whatever method causes you least distress/shirt changing, blend together the cashews, water and lemon juice. Add more water to make the paste saucy-er.
  3. Meanwhile, cook up your veg and mushrooms in a pan - I use a non-stick electric wok, so I don't need to use oil. Hint - add the oinion first, and cook until tender on a low-ish heat, before throwing in the other veg.
  4. When the vegetables look like they'd like some sauce, poor in your cashew goop. This is also the time for pepper, paprika and stock.
  5. I usually cook for a while and find I need to add some water, but it depends on how thick you want the sauce.
  6. Serve on pasta with chopped raw capsicum and coriander.
The finished result will probably not look like this:

Sorry there's no photo. I ate it.